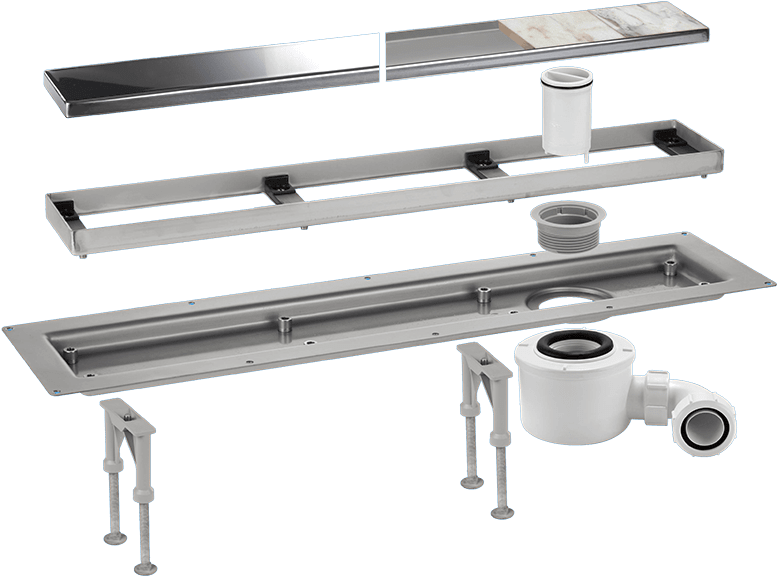
Wet Room Products
Back to top

Slimline Channel Drain

Brushed
Brushed
Brushed
Polished
Polished
  • Available in 6 cover plate lengths from 548mm to 1148mm
  • Choice of 2 finishes - brushed or polished
  • Highest quality grade 304 Stainless Steel cover plate
  • Cover plate reversible to accommodate tiles up to 8mm
  • Frame height adjustable to suit tiles up to 16mm
  • Supplied with 50mm water seal trap and adjustable height support legs
  • Flow Rate 54 litres per minute, calculated under a constant 120mm head of water
Brushed
Length
Product Code
548mm
CD600-O-B
648mm
CD700-O-B
748mm
CD800-O-B
848mm
CD900-O-B
948mm
CD1000-O-B
1148mm
CD1200-O-B
Polished
Length
Product Code
548mm
CD600-O-P
648mm
CD700-O-P
748mm
CD800-O-P
848mm
CD900-O-P
948mm
CD1000-O-P
1148mm
CD1200-O-P

Technical Drawing

General Information

Everything you need in one box

Everything you need in one box

Every McAlpine Channel Drain comes complete with body, cover plate, trap with UK outlet and accessories, so ordering could not be simpler

Channel Drain Flow Rates

Channel Drain Flow Rates

McAlpine Channel Drains achieve a flow rate of 54 litres per minute when tested in accordance with Clause 5 of BS EN 274 2:2002.

Download Wet Room Brochure

Assembly & Features

The Slimline Channel Drain can be used on either concrete or suspended timber floors finished with tiles or stone.

Features - Slimline Channel Drain

Installation Guidelines

Installation - Slimline Channel Drain

Slimline Channel Drain

The following instructions refer to the installation of the tile drain only. They do not include information regarding installation of other elements of the shower cabin, such as sealing the connections between the shower walls and floor, or waterproofing - commonly known as room tanking.

  • Set the level of the finished shower floor surface and mark the wall in line with the area where the channel will be installed. Allow for the slope of the shower surface area.
  • Connect the channel to the drainage system trap and waste discharge pipework and set the height using the adjustable legs so that the upper edge of the channel frame is approximately 1mm below the finished surface level of the shower area.
  • Fill the surface under and around the channel with screed or a similar product to the level of the flange.
  • Cover the flange and surrounding area with a flexible latex waterproofing (liquid form membrane).
  • Apply the sealing membrane in position on the freshly applied liquid.
  • Apply a second coat of liquid membrane to the whole surface of the shower area and sealing membrane.
  • Once the liquid is completely dry, as per the manufacturer’s instructions, the shower surface can then be tiled.
  • Seal the gap between the tiles and the channel frame with a flexible sanitary silicone which can be compatible with the tile grout colour.

Download our latest Wet Room Brochure

Wet Room Brochure

Contact Us

McAlpine plumbing products are designed and manufactured to be installed by qualified plumbing professionals. On this basis we cannot accept installation queries from the general public. Please contact your local McAlpine stockist or a qualified plumbing professional. For all other enquiries please fill out the form below.

CAPTCHA
This question is for testing whether or not you are a human visitor and to prevent automated spam submissions.